wasup
Spring) 인텔리제이(IntelliJ)로 스프링 시작해보기 본문
최근에는 스프링 프로젝트를 할 때 이클립스보단 인텔리제이를 사용한다는 점.
과거에는 maven 프로젝트를 많이 썼지만 요즘에는 Gradle 프로젝트로 넘어오는 추세라는 점.
을...... 늦게알아서 시작한 스프링 프로젝트
1. 인텔리제이 다운로드
2. start.spring.io를 이용한 스프링 부트 프로젝트 생성
3. 인텔리제이에서 생성한 스프링 프로젝트 열기
4. welcome page만들어보기
5. thymeleaf Template Engines
6. gradlew build
1. 인텔리제이 다운로드
https://www.jetbrains.com/ko-kr/idea/download/#section=windows
다운로드 IntelliJ IDEA: 우수성과 인체 공학이 담긴 JetBrains Java IDE
www.jetbrains.com
2. start.spring.io를 이용한 스프링 부트 프로젝트 생성
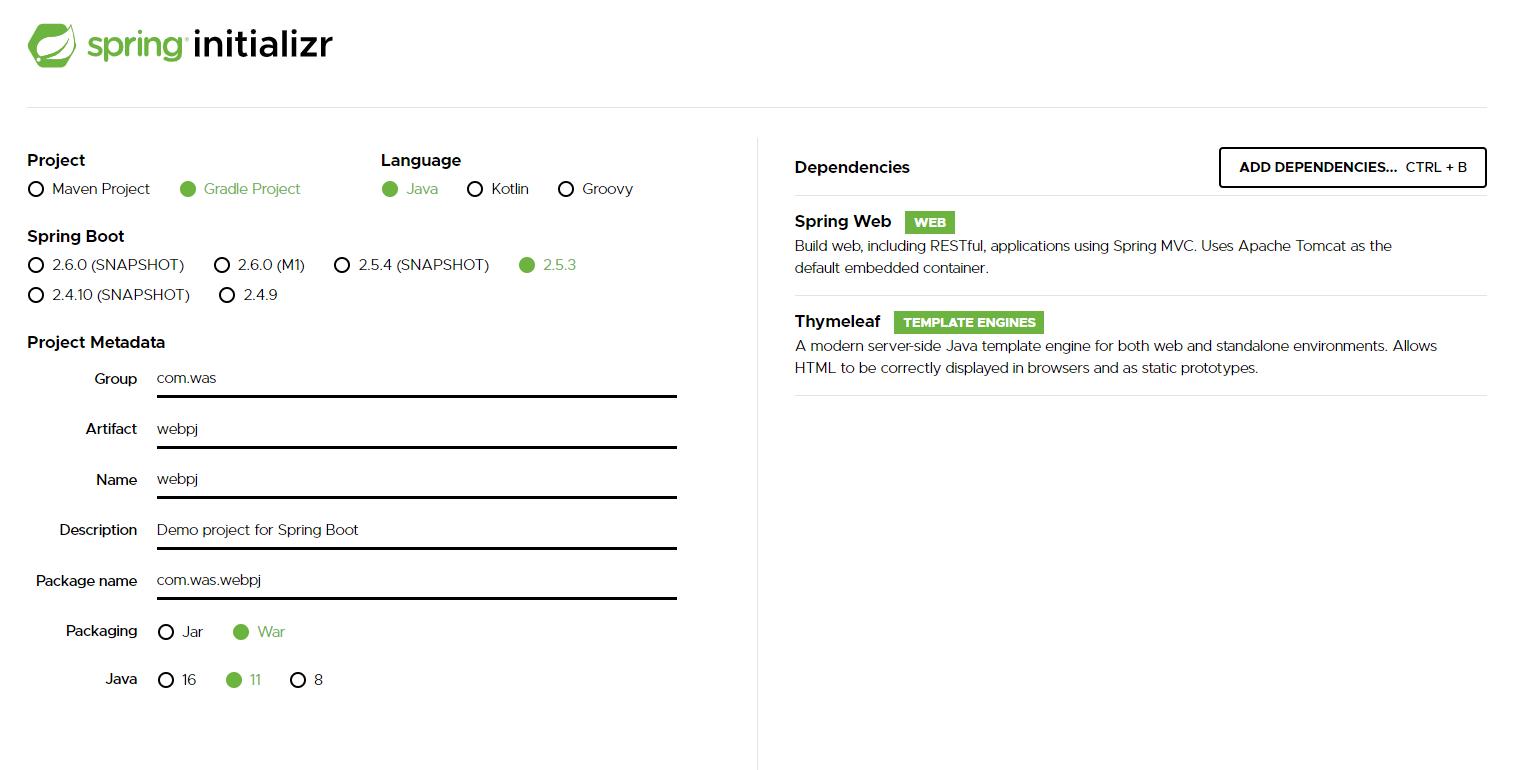
- 2.5.3버전
- Group : com.was
- Artifact : webpj
- Name : webpj
- Description : -
- Package name : -
Dependencies : 어떤 라이브러리를 쓸건지 선택 후 Generate!
- spring web
- Thymeleaf
3. 인텔리제이에서 생성한 스프링 프로젝트 열기
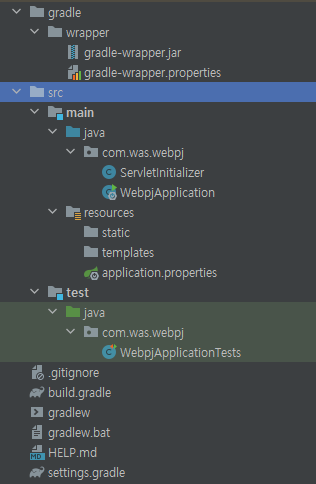
기본 구조가 다 만들어져서 나오는데
src하위의 main과 test, main하위의 java와 resources폴더가 있고
test폴더는 test를 위한 코드를 넣는 곳
main의 java폴더에는 java소스만 넣고
나머지 html, img 등등 java가 아닌 모든 소스는 resources에 들어간다.
Preference : Ctrl + Alt + S
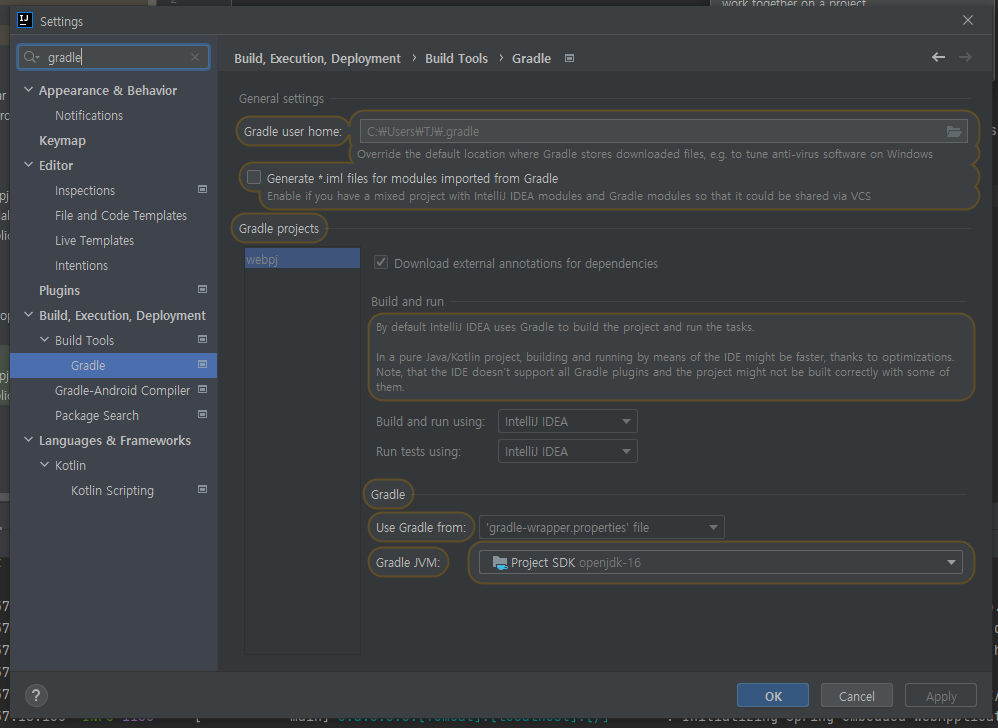
Build and run using, Run tests using 을 IntelliJ IDEA로 변경.
단축키 잘 정리한 포스트 : https://secondmemory.kr/567
[IntelliJ & Code] 내가 주로 쓰는 단축키 (Shortcut)
어떤 툴을 쓰더라도 툴을 잘 쓰려면 최소한 단축키를 잘 알아야 한다고 생각한다. 왜냐면 당연하게도 그래야 생산성이 좋아지니까. 그래서 나는 어떤 툴을 처음 접할 때에는 단축키 목록을 먼저
secondmemory.kr
현재까지 java프로젝트에서 sysout을 많이 썼었는데 현업에서는 log로 남겨서 관리한다구함..
- spring-boot-starter-web
: spring-boot-starter-tomcat
: spring-webmvc
- spring-bootstarter-thymeleaf(타임리프 템플릿 엔진)
- spring-boot-starter-logging
orf.slf4j:jul-to-slf4j 인터페이스를 구현한 ch.qos.logback:logback-classic 을 많이 사용함.
*Logback을 사용하기 위해 SLF4J가 필요
*스프링부트를 사용하면 기본적으로 사용하게 됨.
참고 URL : https://victorydntmd.tistory.com/173
- spring-boot-starter-test
: junit4->5 (테스트프레임워크)
: mockito (목 라이브러리)
: assertj (테스트 코드를 좀 더 편리하게 작성하도록 도와주는 라이브러리)
: spring-test (스프링 통합 테스트 지원)
window에서 grable패널 보기 : alt+alt
4. welcome page만들어보기
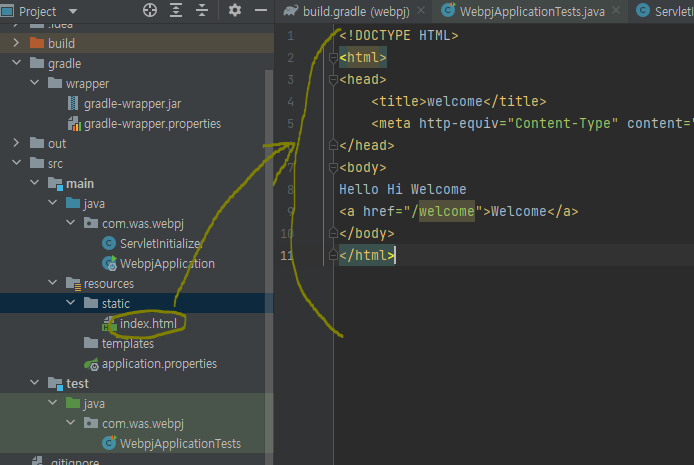
정적 파일 하나 추가해주고
서버 재시작 후 localhost:8080/ 접속해보면

위처럼 정적페이지를 확인 가능하다.
*static 폴더에 만든 index.html과 같이 아무런 서버의 동작이 없이 그대로 보여주기만 하는 파일은 정적 컨텐츠라고 한다.
*jsp나 php와 같이 서버에서 코드가 동작하여 html이 동작하는 것은 템플릿 엔진이라고 한다.
*템플릿 엔진을 이용하기 위해 모델-뷰-컨트롤러를 사용하고 MVC패턴이라고 한다.
편리하게 임포트하기위해 설정에서
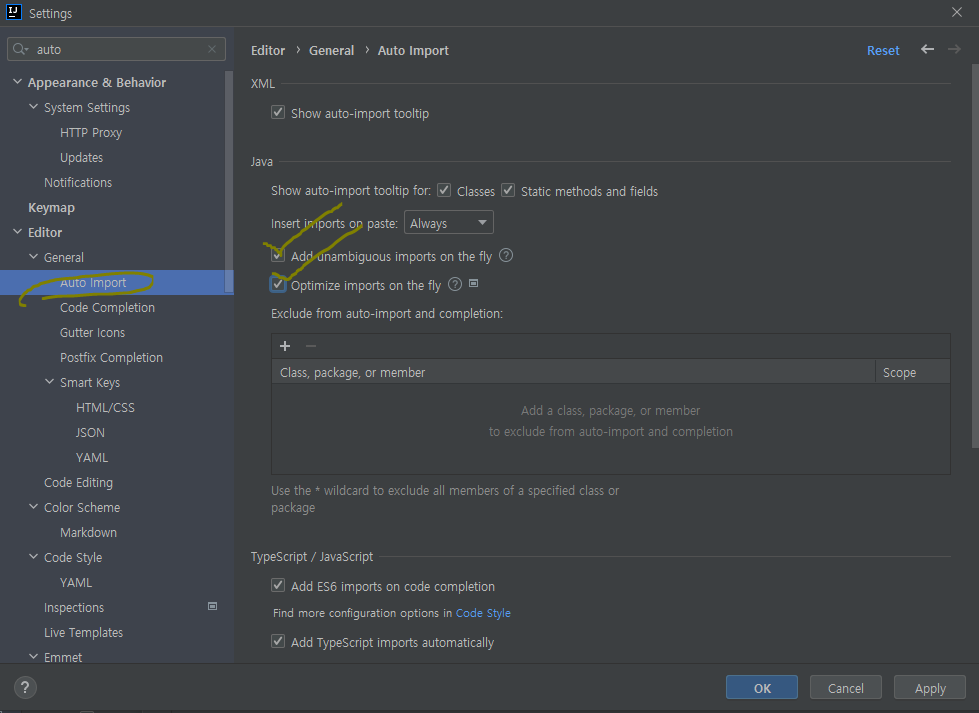
Auto Import메뉴의 Add unambiguous imports on the fly, Optimlze Imports onthe fly 체크
바로가져오기와 바로가져오기 최적화@_@!!
그리고 단축키 CTRL + ALT + O
5. thymeleaf Template Engines
: https://spring.io/projects/spring-boot
: https://docs.spring.io/spring-boot/docs/current/reference/html/features.html
템플릿 엔진을 사용해보기위한 코드 작성 후
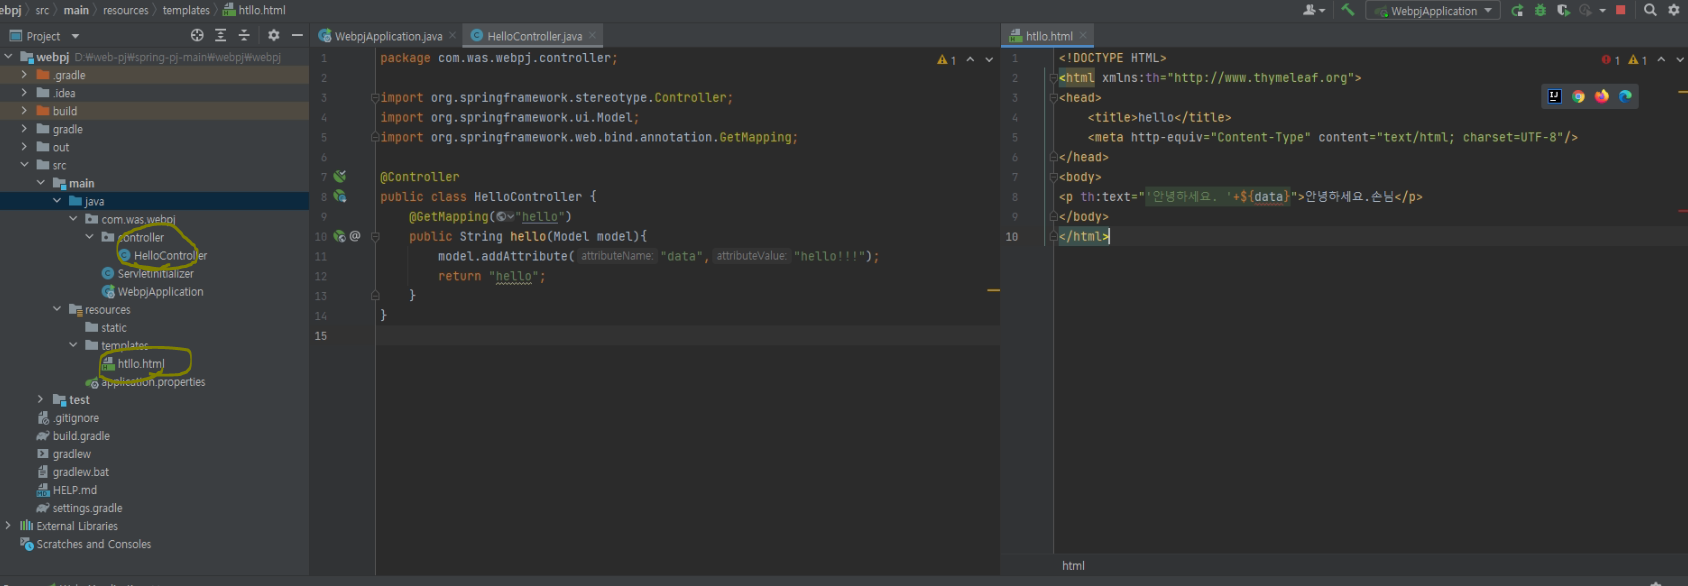
오류1) can not resolve symbol getmapping
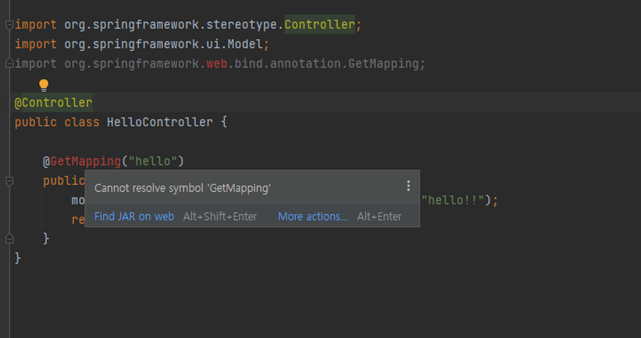
Tip) 해결방법
1) Build > Clean Project 하고 나서, Build > Rebuild Project
2) File > Invalidate Caches / Restart… 를 선택 -> IDE가 재실행
3) 상단 메뉴바 View > Tool Windows > Gradle
-> 프로젝트명을 마우스 우클릭하여, Refresh Gradle Dependencies를 누르고 기다린다.
4) Gradle 빌드 설정을 IntelliJ IDEA 로 바꿔준다.
Preference창(단축키: Ctrl+Alt+S)을 띄워 Build,Execution,Deployment
-> Build Tool -> Gradle -> Build and Run 에서 설정이 Gradle로 되어있다면 모두 IntelliJ IDEA로 바꿔준다.
위 해결방안을 다 시도해봤는데 해결이 안되어서 난항중 ..
결국 프로젝트 새로 만들어서 진행하니 아무 이상히 없음...................
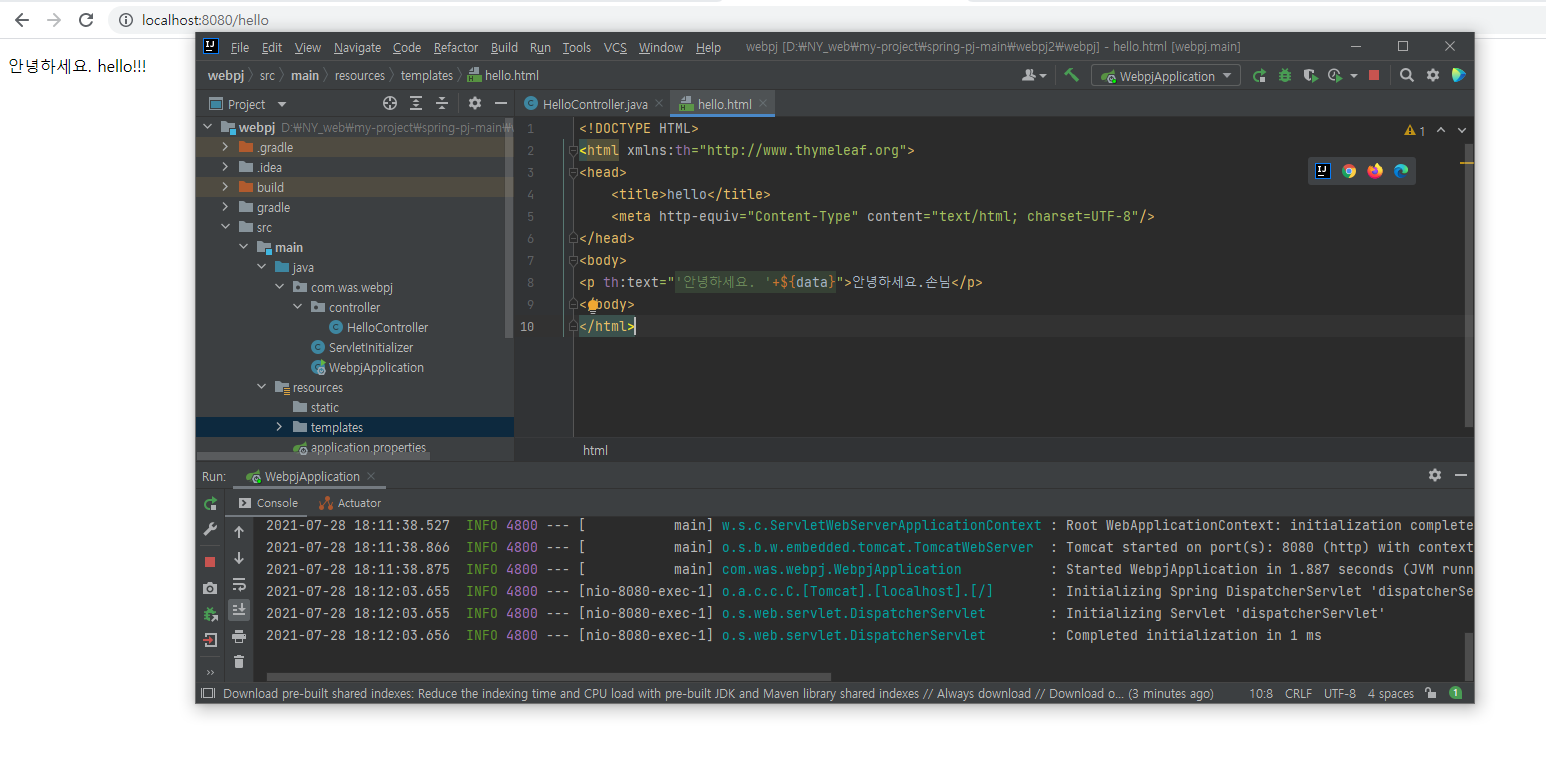
*검색결과 can not resolve symbol오류는 자주 발생하는 오류라고 한다.
오류2)
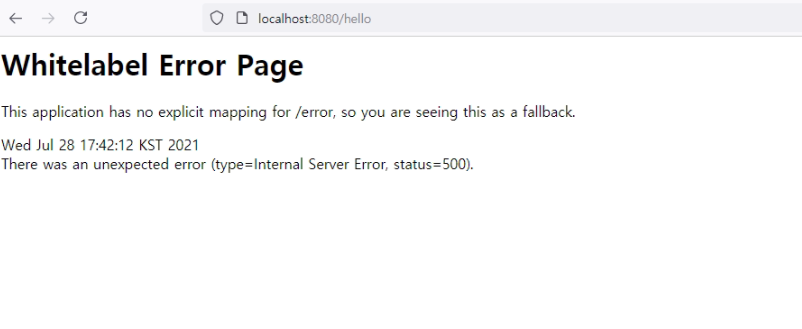
[THYMELEAF][http-nio-8080-exec-1] Exception processing template "hello": Error resolving template [hello], template might not exist or might not be accessible by any of the configured Template ResolversTip) 해결방법
처음 spring프로젝트는 시작하는분이라면 일단 index파일있는지 먼저 확인.
있는데 오류면 링크참고!
https://stackoverflow.com/questions/36697663/circular-view-path-error-spring-boot
Circular View path error Spring boot
I am very new to Spring. I am trying to build a MVC application using Spring Boot which shows a list of products. But i am getting the below error: javax.servlet.ServletException: Circular view ...
stackoverflow.com
역시 해결이안되어서 또 삭제후에 만들었더니 정상..............................
아마 이것저것 파일 살펴보다 뭔가 잘못 만진 것 같다.

Tip)
thymeleaf 템플릿을 테스트해보면서 계속 서버를 재시작해줘야하는 번거로움이 있었는데
spring-boot-devtools라이브러리를 추가하면 html파일을 컴파일만 해 주면 서버 재시작 없이 파일 변경이 가능하다구 한다.
build.gradle파일에서
dependencies안에 implementation 'org.springframework.boot:spring-boot-devtools' 추가!
dependencies {
	implementation 'org.springframework.boot:spring-boot-devtools'
	implementation 'org.springframework.boot:spring-boot-starter-thymeleaf'
	implementation 'org.springframework.boot:spring-boot-starter-web'
	providedRuntime 'org.springframework.boot:spring-boot-starter-tomcat'
	testImplementation 'org.springframework.boot:spring-boot-starter-test'
}
참고 글 : https://ltk3934.tistory.com/41
6. gradlew build
우선 JDK 11이 설치되어있는지 확인
openjdk version "11.0.11" 2021-04-20
OpenJDK Runtime Environment AdoptOpenJDK-11.0.11+9 (build 11.0.11+9)
OpenJDK 64-Bit Server VM AdoptOpenJDK-11.0.11+9 (build 11.0.11+9, mixed mode)
javac 11.0.11
참고 글 : https://webgori.github.io/java/2020/03/21/JAVA-JDK-11-Windows%EC%97%90-%EC%84%A4%EC%B9%98.html
JDK다운로드 : https://adoptopenjdk.net/?variant=openjdk11&jvmVariant=hotspot
cmd창에서 아래 실행
gradlew build
cd build/libs
java -jar pjname-0.0.1-SNAPSHOT.jar'IT > Java' 카테고리의 다른 글
| Spring Legacy MiNi Project - STS / member java (0) | 2021.08.05 |
|---|---|
| Spring) Note - 개념, 관계, 테스트케이스 JUnit (0) | 2021.07.31 |
| JUnit) unit test!!! (0) | 2021.07.08 |
| COMMENT 구조 (0) | 2021.06.29 |
| MyBatis Transaction 트랜젝션 Note (0) | 2021.06.28 |

